
Matting and Mounting Prints
[Update 20 July 2019 – A new Mat Cutting Calculator in Excel format is available on the downloads page]
This tutorial covers two cases:
- the easiest one, where you already have a finished print and you want to make a mat for it, and
- the slightly harder one, where you want to make a mat to a specific size (such as the club’s maximum dimensions) and need to know how big a window (hole) to make in the mat, and how big to print your photograph.
In either case, the marking up and cutting techniques are the same. You need a steel 
 straight edged ruler (longer than 500mm), a sharp blade or craft knife to make vertical cuts and a sharp blade set to make accurate 45 degree cuts like the ones here. You can get them at good art supplies stores or, probably, on TradeMe.
In either case, the process for sticking the mat, image and mount together is the same.
Whatever kind of mat you’re making, it’s a really good idea to make a rough drawing on a piece of paper with your measurements on it rather than try to keep everything in your head.
The easiest case: you have a finished print
Sizing and Cutting the mat and mount
- Measure the width and height of the printed image (not including any border). Sketch it on your rough drawing and write the numbers in.
- Subtract 2mm from each dimension. That will be the size of your window in the mat. (You can take more off if you don’t mind losing more of your image).
Sketch that on the rough drawing and write the numbers in. - Decide how wide you want your mat edge to be. A whole number that’s about ⅓ of the horizontal dimension of of the image is a good starting point. (There are no rules, except don’t make it too narrow or it will look silly.)
The side edges and top of the mat should be the same size.
Mats often look better if the bottom edge is a bit bigger: a good rule is about ⅓ bigger than the side edges. For example, if your mat is 60 mm at the sides and top, a reasonable depth for the lower edge would be 60 mm + 1/3 of 60 = 80mm - Sketch the outline of your mat onto the rough drawing and write the numbers for the mat widths onto it.
- Work out the total width of your mat = width of window + 2 mat edges: write that on the rough drawing, and …
work out the total height of the mat = height of window + top edge + bottom edge: write that number onto your rough sketch.
This last step gives you the outside dimensions of your mat and mounting board. - Turn the mat board upside down. Using your ruler and a decent sharp pencil mark on the external dimensions of the mat board from step 5.
Mark up the mounting board using the same dimensions (Experienced club member Jim Graydon, recommends cutting the mount board a fraction smaller so that it is less apparent from the front.) - Using your ruler and sharp pencil mark up the insides of the mat using the numbers you got in step 5 for the edges, top, and bottom.
- Before you even think about cutting anything:
– Check that the drawing looks like the rough sketch
– Carefully measure the outline of the cut-out and check that the dimensions are the same as on your rough sketch
– Carefully measure the drawn width of the mat edges and make sure they are the same width on either side and the top.
– Lie your print on the board and check that the size of the image is (just) bigger than the drawn size of the cut out. - Use your vertical blade to cut the outside cuts on the mat board and mounting board.
- to cut out the window, leave the mat board upside down and use your 45º angled cutter to cut the inside lines. Make sure the sharp end of the blade is angled towards the edge of the mat, not the middle. You are best to slightly overcut, rather than undercut, the corners if you can’t get them spot on. Torn out corners look untidy, whereas, assuming your blade was sharp, the slits from overcuts can easily be disguised with a little bit of pressure with something like the back of a fingernail.
Assembling the mat, image, and mount.
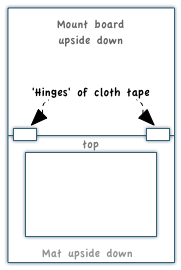 Lie both the mount and mat upside down, aligned and butted together at the top edge. Using cloth tape, make a ‘hinge’ join. You can make this all the way along the edge or just in a couple of places as in the picture.
Leaving the mat upside down, lie the photograph, also upside down, over the window. Position the photo carefully so that it is ‘square’ and the edges of the image all fall outside the window (ie hidden by the mat.)
Now use sticky tape to make another pair of hinge joints,  near the left and right top corners of the print, to hold the photo over the window, hanging from the top. (The picture shows only the left corner.)

Hanging with two pieces of tape like this prevents the image ‘buckling’. If you stick the image along a whole edge, and even worse if you stick on more than one edge, the image will almost certainly buckle. This is because photo paper and mat board expand and contract according to the moisture content in the air, but they do not expand and contract at the same rate.
For photos for club competitions where you may wish to take the mount apart for reuse, it’s probably OK to stick the photo on with ordinary sellotape.
If you were intending to mount an image for more permanent display or sale, you would want to use archival, ‘acid-free’ tape (as well as acid-free board for mount and mat). Also, the experts recommend a “T hinge” for fixing the photo to the mat to minimise the likelihood of the image becoming detached after time and falling in the frame.
Lastly, ‘close’ the frame using double sided tape between the three remaining edges to hold it together. (Some people in the club use velcro ‘buttons’ to close the mat-mount so that it may more easily be used again.)
The harder case: you want to make a mat to maximum club dimensions
The maximum mat/mount dimensions acceptable for club competitions is 500mm on the longer side, by 400mm on the shorter side.
i.e. the mat may be
- 500mm wide and up to 400mm deep for a landscape image, or
- 500mm deep and up to 400mm wide for a portrait image.
The challenge is how wide to make the mat edges so that the window fits the image properly.
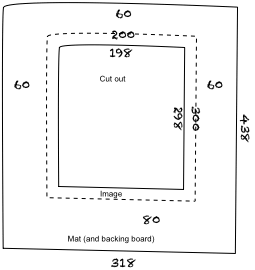
If you always print to exactly the same size and crop ratio, it’s very easy for a landscape image. Using the example in the picture:
Measure
- the width of the image ( = 360mm wide x 240 mm high in our example )
- Calculate the width of the ‘window’ by subtracting 2 x 2mm from the image width ( 360 – (2 x 2) = 356 )
- subtract the width of the window from 500mm ( 500 – 356 = 144)
- divide by 2, to get the mat edge and top width ( 144 / 2 = 72 )
Make the bottom of the mat about ¼ bigger than the edge ( 72 + ¼ of 72 = 72 + 18 = 90 )
The height of the mat = top + (height of window) + bottom ( 72 + 236 + 90 = 398 )
Put all these measurements on your rough drawing on a piece of paper, and transfer the measurements to the back side of the mat board in the same way as before.
Before you cut the board, lie the photo on the board and make sure the image overlaps your proposed window by a couple of mm all around.
Cutting and finishing is the same as before.
For a square, or portrait image repeat all the above except replace 500mm by 400mm because the maximum width of the mount is 400mm.
You will find that you get ‘nice looking’ mats at the club’s maximum if the
image size of your landscape prints are about 360mm wide; and
image size of your square or portrait prints are about 360 mm high.
